Browser Privacy Settings
Internet browsers serve as gateways to accessing the Internet. However, they are not just a pathway to the Internet – they also offer ways to both increase your online privacy and control your personal information. All common browsers offer in-browser privacy settings, and this document will cover specifics for the most common desktop and mobile browsers. For information about tools beyond browser privacy settings that you can use to increase safety and privacy while online, see Safety Net’s Tools for Safer Browsing resource.
Before We Start: Prioritize Safety
Using these options may increase your privacy and safety. They can also help you have more control over how your personal information is collected and stored when you are online. However, it is important to acknowledge that for many survivors, strengthening browser privacy settings isn’t enough, and can even be dangerous. If an abusive person regularly monitors your devices and accounts, they may know that settings have been changed. They may be able to change settings themselves, or coerce or force you to weaken your privacy settings in other ways. They might become more abusive. In some situations, making changes could also erase evidence.
There isn’t one “right” way to increase your privacy and safety, only ways that do or don’t fit your situation. What works for someone else may not work or be safe for you. Always prioritize safety and trust your instincts. You may find these safety steps useful:
Use a safer device. If you think that someone is monitoring your phone, computer, or accounts, use a different device (such as a library computer or a friend’s phone) and account that the person cannot access (and that they have not had access to in the past).
Get more information. Navigating violence, abuse, and stalking can be difficult and dangerous. Advocates can help you figure out options and local resources and help you create a plan for your safety. You can contact a national helpline to be connected with local resources.
Browser privacy options will not protect you from remote spying or monitoring if an abusive person is using stalkerware. To learn more about stalkerware, and to get other tips about tech safety as a survivor, see Safety Net’s Survivor Resources Toolkit.
This handout discusses various options that can enhance a user’s privacy in the browsers that together are used by the vast majority of US users. For desktop devices, it covers:
Apple Safari (macOS)
For mobile devices such as phones or tablets, it covers:
If you are using a Mac, private browsing and accessing settings work slightly differently than on a PC. The same is true for an iPhone vs an Android. The initial directions in this handout are intended for PC users. For Mac instructions, read the “Accessing Privacy Settings and Private Browsing on a Mac” section.
Privacy While Changing Settings
If you’re worried that someone else is monitoring what you do on your device, some browsers allow you to log in to an account that is connected to other services by the same company. For instance, Chrome allows you to log into a Google account, and Edge allows you to log into a Microsoft account. If you log into your account on a safer device, such as a library or school computer, and change your browser privacy settings there, they will be automatically changed in that browser on every device where you are logged into that account on that browser. This is one possible tactic for having more privacy while changing browser settings. Trust your instincts about safety, and if you use this tactic, remember to log out of your account on each browser once you finish changing your privacy settings.
An Introduction to Browser Privacy Settings
Note: You should generally update to the latest version of whatever browsers you are using. Browser updates often fix security flaws and add functionality.
Browsers offer many tools and options to increase privacy. These include:
Controlling activity logs (history) – Your browser logs the webpages you visit, which could be used by an abusive person to monitor your online activity. You can erase part or all of the history for a particular browser. If you erase all of your history, and this is not something you regularly do, an abusive person may suspect that you are doing so to avoid monitoring.
Deleting cookies – Cookies are bits of data that websites send to your browser when you access that website, that help the website remember your activity there. Sometimes they track your browsing activity across other websites. Deleting them means that the tracking cookies cannot track you, and that an abusive person who looks at your cookies to monitor your online activity will not see them. However, you will have to log into websites again. If you suddenly have no cookies, an abusive person may realize that you are deleting them.
Private browsing – This option allows you to browse the Internet without the browser saving history or cookies after it is closed. This is helpful if you are concerned that someone may be monitoring your browsing history, or if you are concerned about cookies leading to ads popping up later about sensitive topics. Private browsing will not prevent someone from knowing what you’re doing online if they are looking over your shoulder or are monitoring your device in another way. It does not hide your IP address, and does not hide your browsing activity from your Internet Service Provider.
Do Not Track – This is a setting that allows users to request to opt out of being tracked across the Internet by the website that you’re visiting. Some sites respect this request while others do not. So even if you have this setting turned on, it is still useful to use a browser extension that blocks trackers. This feature is only for third-party tracking, which often tracks users for behavioral advertising purposes; it doesn’t prevent the website that you’re visiting from collecting information about you.
Options to save or not save usernames, passwords, and other personal information – Modern browsers allow you to save usernames, passwords, and sometimes other information like credit cards or addresses. If you are concerned that someone can view and use your browser, or accounts that you have used to create a browser profile (such as your Google account for Chrome or your Microsoft account for Edge), you may not want to save this kind of information in your browser, since then the other person could access it. If you are not concerned about this, it may be a helpful way to remember your passwords so that you can create strong unique ones for every login (which you can also do with a third-party password manager). You can read more about passwords and how to manage them, including the risks and benefits of different types of password managers, in our resource on increasing password safety.
Other browser-specific settings that we’ll discuss later.
The rest of this document discusses options available in different browsers, and how to access them.
Google Chrome
Deleting History and Cookies in Chrome
Return to the Privacy and Safety section of Chrome settings as described above. Select “Clear browsing data.”

Once you select “Clear browsing data,” you will see a popup that lets you choose what data you want to delete, and from what range of time. Make your selections, then click “Clear data.”

Private Browsing: Incognito Mode
Search for the Chrome app and select “New Incognito window” as shown below (or if you prefer, open Chrome and then choose “New Incognito window” from the menu that comes up when you click the three vertical dots in the upper right-hand corner). You will remain in incognito mode until you close this browser window.

Do Not Track
Click on the Menu icon in the top right corner and choose “Settings.”

Click on “Privacy and Safety.” Toggle the switch labeled “Send a ‘Do Not Track’ request with your browsing traffic” so that the setting is on, as shown below.

Additionally, Google uses “Protect My Choices,” which installs opt-out, site-specific cookies on your computer. This requires installation of an extension instead of just a change in settings. It also doesn’t stop websites from collecting information about your activity; it just stops them from showing you targeted ads. If you want to use Protect My Choices:
Visit Chrome webstore and install Protect My Choices.
You'll see a pop-up confirming that it has been added to Chrome.
Additional Privacy Options for Chrome
Click on the Menu icon in the top right corner and choose “Settings.” (You can also navigate to the “Settings” section from the History page.) Then click on “Show advanced settings” at the bottom of the page. Here you can determine whether Chrome can (1) enable phishing and malware protection, (2) use a prediction service to help complete searches and URLs typed, (3) offer to save your passwords (see “An Introduction to Browser Privacy Settings” earlier in this document for more information on the risks and benefits of this), and (4) use Autofill for webforms.
Privacy Checkup
Google offers a service called Privacy Checkup that allows you to review your privacy settings of any Google products you use, such as YouTube. Visit the Privacy Checkup website for more information.
Microsoft Edge
Deleting History and Cookies in Edge
Return to the Privacy, search, and services section of Edge settings as described above. Select “Clear browsing data.” You will see a popup like the one below asking you which data you want to clear and for what time period.

Private Browsing: InPrivate Window
Search for the Edge app and select “New InPrivate window” as shown below. A new window will open with an explanation of InPrivate Browsing. You will remain in this mode until you close this browser window.

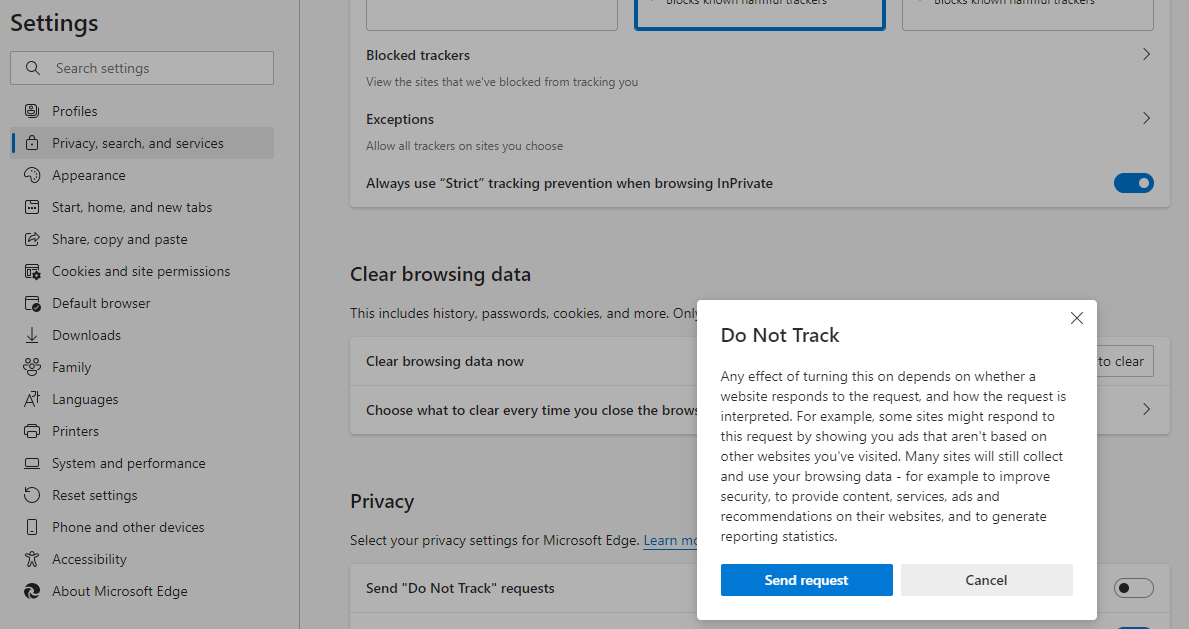
Do Not Track
In a new window, open Settings and click on the “Privacy, search, and services” menu at the left. Scroll down to “Privacy” and toggle the “Send ‘Do Not Track’ requests” switch to the “on” position. Edge will show you a popup explaining the limitations of Do Not Track. Click the “Send Request” button.
Additional Privacy Options for Edge
Go to the “Privacy, search, and services” setting in the same way that you did to access other privacy options. Scroll down to “Personalization & advertising” and “Security.” Turn off “Personalization & advertising” so that Edge is not showing you content based on your browsing activity (which could alert an abusive person that you were visiting particular types of sites). Make sure that security settings are set in the way that you want them.

Scroll down to “Services” and turn options on or off according to your preferences.

If you click on “Address bar and search” under “Services,” you will see another menu. Turn off both options, as seen in the image below, for the maximum level of privacy in your searching. You can also choose a search engine other than Bing as your default search engine, if you would prefer a different one. While there are many ways to increase browsing privacy regardless of what search engine you use and many reasons to use any given search engine, DuckDuckGo is designed as a privacy-centric search engine, which may make it appealing for some survivors.

Mozilla Firefox
Deleting History and Cookies in Firefox
Under the same Privacy & Security section of Settings, you can choose to have Firefox to clear all cookies and site data, clear some of them (you can choose from which sites), or to delete cookies and site data any time you close Firefox (with the option for exceptions set by you).

Private Browsing
Search for the Firefox app and select “Firefox Private Browsing” or “Firefox” and then “New private window” as shown below.

A new window will appear, displaying the Firefox Private browsing icon instead of the regular Firefox icon, explaining Firefox’s Private Browsing option. You will remain in this mode until you close this browser window.
Do Not Track
In a new window, click the icon with three horizontal lines in the upper right corner, and select “Settings” from the menu that pops up. Under “Privacy & Security,” select the “Always” option for “Send websites a Do Not Track signal that you don’t want to be tracked.”

Additional Privacy Options
Firefox has numerous other privacy options within Settings. Most significantly, you can see which websites have permissions to interact with your computer in certain ways (such as use of your camera or microphone), and add or remove websites from those permissions lists. You can also ask Firefox to block pop-up windows and/or warn you if websites try to install add-ons to your browser.

Accessing Privacy Settings and Private Browsing on a Mac
Google Chrome
You can find the app’s menu is in the upper-left-hand corner, where the Chrome settings will be listed as “Preferences.”

You can erase your browsing history directly from the Chrome menu as well.
To open a private browsing window in Chrome on a Mac, open the File menu at the top of the screen and select “New Incognito Window.”

Safari
Safari, a browser made by Apple, comes on Macs and is a popular choice for Mac users. To access settings in Safari, open Safari, click on the app name in the upper left-hand corner of your screen, and click “Preferences” in the drop-down menu. You can also clear your browsing history in Safari directly from the drop-down menu by clicking “Clear History,” which is circled in brown in the below image.

Within Preferences, select the “Privacy” tab to view and adjust basic privacy settings. Safari has strong privacy options, including the ability to hide your IP address from trackers that track your online activity across websites.

Like other browsers, Safari has a private browsing option, which you can activate by selecting “New Private Window” from the “File” drop-down menu in the upper-left corner of your screen once you have started Safari.

As with other browsers, if you are concerned about someone being able to access your device or browser either physically or remotely, you may not want Safari to be able to autofill webforms.

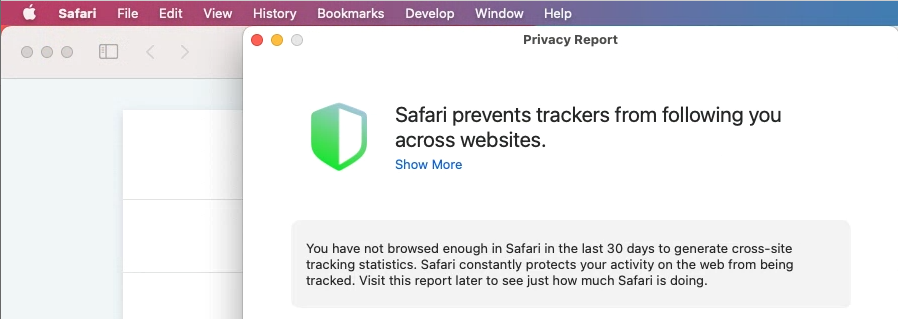
If you would like to see information on how websites track your browsing activity, and how much of it Safari has blocked, the drop-down app menu for Safari also has an option called “Privacy Report,” which will provide you with a report as shown below.
Mozilla Firefox
In Firefox, you can clear your recent browsing history through the “History” drop-down menu, which also has an option to see (and clear) all of your browsing history.

As with Chrome and Safari, the settings panel on Firefox for Mac is called “Preferences” and is in the drop-down app menu.

And just as with Chrome and Safari, private browsing can be started from the “File” drop-down menu.

Microsoft Edge
If you are using Microsoft Edge on a Mac, adjusting settings works similarly to other browsers on a Mac, in that you can access settings (“Preferences”) from the app drop-down menu, and private browsing (“New InPrivate Window”) from the “File” drop-down menu.


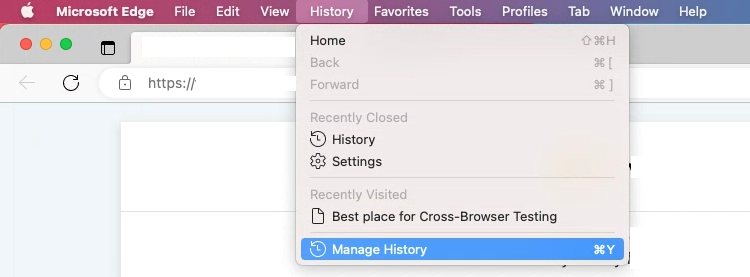
There is no instant shortcut to delete browsing history in Edge, but you can delete or otherwise manage it by selecting “Manage History” from the “History” drop-down menu.
Mobile Versions of Browsers
Google Chrome for Android
The version of Chrome for mobile devices has similar privacy settings to the desktop version (and you can access them similarly). However, there are a few extra considerations in the mobile version.
The mobile version makes it easy to synchronize data across all devices (mobile or desktop) on which you use Chrome. This can be a useful feature if you want to update something in your Chrome account from a safer device and have the changes apply to other devices. However, it can also be a privacy risk if an abusive person has your Google account password, because they will be able to access your Chrome account data and settings from all the synchronized devices. As always, trust your instincts and do what makes sense for your situation.

Similarly, Google makes it easy to use a phone that is linked to your Google account as a security key to make it simpler to log in. If you are concerned that there are devices linked to your account that shouldn’t be, and you feel that it’s safe to do so, you can instantly unlink all other devices from your Google account with a single button click, as shown below.

Chrome on mobile now has a Safety Check feature that allows you to easily keep it updated and protect your device from malicious websites as you browse. Keeping apps updated is good cybersecurity practice. Safety Check also allows you to store passwords. See “An Introduction to Browser Privacy Settings” earlier in this document for more information on the risks and benefits of this – you may prefer to use a third-party password manager, rather than Chrome’s built-in one, to store passwords. For more information about passwords and password managers, see our resource on password security.

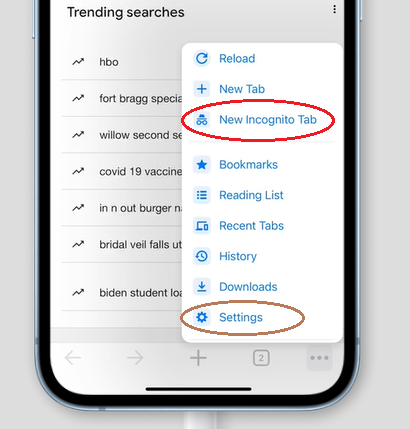
Google Chrome for iOS (iPhone, iPad)
If you are using Chrome on iOS, you can find both private browsing and the Settings display in the menu that appears when you press the three horizontal dots in the corner of your browser window.
Within “Settings,” there is a “Privacy” tab which allows you to clear browsing data easily. There is also a link labeled “Sync and Google Services,” which will take you to another tab. Syncing your activity works the same on iOS devices as it does on Android devices.

Chrome for iOS has a “Safety Check” feature just like Chrome for Android. This feature is in “Settings,” just above “Privacy.”

Mozilla Firefox for Android
In the mobile version of Firefox, you can modify privacy settings so that all links you click will open in private browsing tabs, and Firefox will not save the information that you visited those pages. You can access privacy settings in the mobile version of Firefox by pressing the three vertical dots in the upper right corner of the screen and selecting “Settings.” From there, press “Private browsing” and toggle “Open links in a private tab” to the “on” position.

If you want to launch a private browsing tab yourself, you can do so by pressing the number in the upper right-hand corner of the app, pressing the mask icon, and then pressing the “+ Private” button, as shown below.

If you are concerned about someone having access to your device, you may not want Firefox to store or autofill your usernames and passwords for your accounts, since then the person with access to your device could access your accounts. You can disable them by pressing “Logins and passwords” in Settings, turning off Autofill, and pressing “Save logins and passwords” to choose “Never save.”

Similarly, if you are concerned about someone having access, either remotely or physically, to your device, you may not want Firefox to autofill your address or credit card information. You can turn these features off by pressing “Autofill” to display the Autofill menu, and then toggling them to the off position.

Finally, to avoid (even if you are not using private browsing) targeted ads that may provide clues regarding your browsing history, and companies having and possibly selling information regarding your online activity, you can press “Enhanced Tracking Protection” and select the “Strict” setting.

Samsung Internet (Android)
Samsung Internet is a browser that is pre-installed on phones manufactured by Samsung. Accessing its settings, which include its privacy dashboard, an option to manage and clear personal browsing history, and permissions, requires pressing a button at the bottom of the screen and then pressing the “Settings” icon.

“Personal browsing data” allows you to clear your history, and to choose whether you want Samsung Internet to be able to autofill forms and store usernames and passwords. If you are concerned about someone having access to your device, you may want to turn these features off. “Secret mode” is Samsung Internet’s version of private browsing, which can be password-protected. “Secret mode settings” allows you to set a password for secret mode.

Secret mode itself can be turned on from the new-tab launcher at the bottom of the screen.

Safari (iOS)
On iOS mobile devices, you can access Safari’s menu by pressing the puzzle piece icon circled in red in the image below, which gives you options including a privacy report (similar to that of the desktop version of Safari for Macs) and a panel through which you can adjust settings for specific websites.

Website settings allow you to set whether a given website has permission to use your phone’s camera or microphone or access its location (below left image). Pressing the book emoji at the bottom of the screen allows you to view and clear your history, by pressing the clock icon and then “clear” at the bottom right-hand corner (below right image).

WebView (Android)
WebView is a feature for Android that allows applications (such as Instagram or Gmail) to open links without leaving the app. This means that your data is not being shared between that app and a “regular” browser. It does not have the features of most browsers, but it is fast and can be used as a standalone browser. It is the default browser that comes with many Android tablet devices.
As WebView is primarily intended as a feature for other apps to use, it does not have a settings menu. If you are using it as a standalone browser, pressing the button with three vertical dots in its top right-hand corner, as shown in the below screenshot from a tablet device, gives you the option to destroy this particular WebView and create a new WebView, which will also erase any data that WebView had stored while you were browsing.